Baked Turkey Meatballs Smothered in Honey Garlic Sauce

31 Aug

20140819_203218

Today I am going to share a meal I made when you have one of those “have no idea what to make” situations.  I found some ground turkey in my freezer and bam! I was inspired.


Turkey Meatballs Smothered in Honey Garlic Sauce

What you will need:

*keep in mind you can do what you want to the meatballs, I really didn’t measure anything and just threw in what I had on hand*

1 package ground Turkey or Chicken

1 Egg

about a 1/4 cup Bread Crumbs

about a 1/4 cup Parmesan Cheese

1 shallot, chopped finely

about a couple tbsp fresh Basil

1 tsp Onion Powder

Salt and Pepper to taste

Preheat your oven to 400 degrees.

Mix all the ingredients in a bowl and roll ground meat into 1 inch balls, place on a greased cookie sheet. Bake for about 20 minutes, I suggest turning over the meatballs halfway through to prevent the bottoms from overcooking.

In the meantime, make your sauce.


Honey Garlic Sauce

3/4 cup Brown Sugar, packed

2 tbsp Corn Starch

3/4 cup Water

3 tbsp Soya Sauce

1 tbsp Honey

2 cloves Garlic

Combine sugar with corn starch.  Add water, soya sauce, honey, garlic and bring to a boil.  Stir constantly until thickened.


Serve your meatballs over rice with the sauce, and enjoy a quick and easy meal that is sure to satisfy.


Salsa ala deliciouso!

27 Aug

20140825_155848

Looking for a fantastic salsa recipe that is practically foolproof and super delicious!?

Look no further!

An old client of mine from a few years ago gave me this recipe, she also gave me a bunch of heirloom tomato seeds that introduced me to the wonderful world of heirloom tomatoes! I make this salsa every year to help use up all those tomatoes you get bombarded with!  Last year was the only year I didn’t use this recipe and my salsa was awful!

Salsa Ala Deliciouso!

You will need:

(keep in mind you can multiply this recipe)

10 lbs Tomatoes (I used my early girls and my mennonite orange heirloom tomatoes)

3-4 banana or serrano peppers (basically any kind of pepper that has a milder heat and some sweetness)

2 Jalapeno peppers (you can use more, for more heat)

2 Medium onions

2 Green bell peppers

2 Red bell peppers

8 Cloves of garlic

Brine:

1 cup Vinegar

1/3 cup white sugar

1 can Tomato Paste

1 tbsp salt

2 tbsp Paprika

1 tbsp Cumin

2 tbsp Fresh Cilantro


Chop the first 7 ingredients into a large pot, Add the brine to the vegetables and put on the stove.  Bring to a boil and stir occasionally.  Turn stove down to low and boil down the salsa, this usually takes about 4 hours.  Just until some of the liquid is boiled down and the flavors have a chance to intermingle. Be sure to keep stirring, otherwise the salsa will burn to the bottom of the pot, creating  a smokey flavor in the salsa (unless you want that flavor!).

Clean and sterilize your jars, make sure they are warmed up a bit before you fill your jars.  Using a ladle, fill your jars with the salsa and wipe the edges of the jars clean before putting the lids on.

Process your jars in a canner, you will have to look up how long for your area but I did 10 minutes and that was sufficient.

Once you have your jars out of the canner, put them in a place you know there won’t be any breeze, you don’t want those jars exploding! 

I always make sure I put one aside to been eaten right away, grab your taco chips and enjoy!


Pickles and Pickled Carrots

24 Aug

20140728_143839

Today I would like to share a family recipe my mother and grandmother used for many years as their pickle recipe.  My mom’s pickled carrots were famous back in the day, I would have friends over and they would finish a whole jar in one sitting.  The pickled carrots were in constant demand, I don’t know how my mom kept up. The dills were just as amazing, and the recipe is the same for both, so I end up doing a batch of both at the same time.

Pickles and Pickled Carrots

First things first, you have to soak your cucumbers and carrots overnight to ensure a nice crunchy pickle.

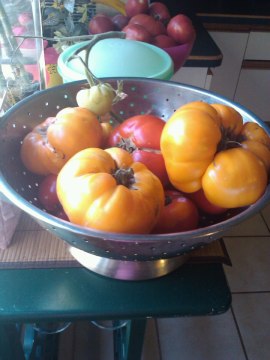
I also recommend using homegrown ingredients (go to the farmer’s market if you have to), it just makes for a way better pickle! I am just lucky to have a garden, parents that grow garlic and the best farmer’s market around. It can be difficult timing your pickling cucumbers and dill, so they are ready at the same time so some years I rely on the market.  This was the first year I managed to time them out perfectly!

I usually just use what I have, so I am not going to put a set amount of either.  You can make more or less brine to accommodate the amount of cucumbers and carrots you have and how many jars you have.

What you will need:

Pickling Cucumbers and/or carrots (carrots cut into smaller-bite sized pieces)

Dill

Garlic

White Vinegar

Coarse Salt

Water

Canning Jars (as many as you think you will need, this is an art I am finding.  I usually grab too many to be sure)


First you want to sterilize your jars (I usually just wash them, but if you want to be sure put them in boiling water for a few minutes).

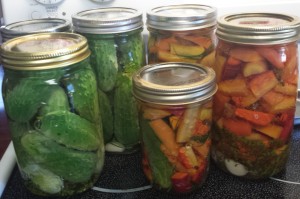
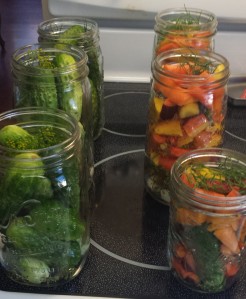
Fill the bottom of your jars with a couple cloves of garlic per jar, then carrots /cukes, dill, carrots/cukes and so on.  Layer these ingredients.

20140728_141656

Pour water in each jar, and dump to measure how much brine you are going to need.

Mix 4 cups of water to 2 cups of vinegar, with 5 tbsp of salt.  (amount all depends on how much brine you need, just remember the 2-1 ratio and as for the salt you will have to do some math to figure that one out, I find it doesn’t have to be exact though so I usually guess).  Bring to a boil.

This is when I arrange my jars with the lids right next to them to ensure quick sealing.

Also have a little boiling water on hand ready to go in case you need to top up a jar a little.

Fill each jar with a little brine at a time to prevent cracking until they are full, be sure to leave a 1/4 inch from the top.

Put the lids on and close right away, the jars will eventually seal themselves. (you may be startled by the pop pop noises they make)

Allow 4-6 weeks to sit and then they will be ready to enjoy!

There is no need to process these pickles, I never have and have never had any problems!

**If you want to, you can also add a Bay leaf in each jar to make a more kosher pickle.


BBQ Pork Tenderloin

13 Aug

2014-07-11 21.01.58

Pork Tenderloin is my personal favorite part of pork (other than Bacon of course), it’s lean, and I have never been a fan of the “fatty pieces” from different cuts of pork.

I found this recipe on pinterest from a blog called http://bsinthekitchen.com, I was skeptical about doing the tenderloin on the bbq due to the drying out factor.  So I braved it and tried this method of cooking and it turned out amazing!!!

I almost couldn’t get a picture of the tenderloin, it went so fast!


BBQ Pork Tenderloin

1 Pork Tenderloin

Marinade:

1/4 cup orange juice

1/8 cup tomato paste

1 tbsp whole grain dijon mustard

2 cloves garlic (minced)

2 tsp chilli powder

1 tsp sugar

1 tsp ground coriander

1 tsp paprika

1/4 tsp Worcestershire sauce

salt to taste

Mix your marinade in a bowl and throw into a plastic ziploc with the tenderloin. Let marinade a minimum of 2 hours, I like to do it overnight if I can and I am actually on the ball.

Heat up your BBQ on medium heat, grease the grill a bit.  Put your tenderloin on the grill for a total of 20 minutes, turning every 5 minutes. I use my meat thermometer to check the temperature, and it should read 170 F.

Here is the key to a not so dry tenderloin!

The recipe called for a cutting board with a foil tent over it, make sure that you are able to fully close up the tent completely sealed.

Place your tenderloin in the tent and seal up for 10 minutes, this allows the juices to soak back into the meat creating a nice juicy cut. Make sure to not cut into the meat until this process is done.

The recipe calls for sprinkling cilantro and green onions on after, I didn’t do this but I am sure it would make it excellent.

Voila!  You now have a juicy and delicious tenderloin with that fantastic BBQ flavor, the meat didn’t last long when I made this!


Pickled Garlic Scapes

9 Jul

DSCF0642

It’s that time of year when the garlic scapes have been picked off the garlic to allow a proper bulb to form.

Most people don’t know what they are until I explain they are like onion tops but from garlic instead.  Garlic scapes are much harder and chewier than onion tops, but make an excellent pesto or can be pickled.  My parents grow garlic, and used to throw away the scapes until I started claiming them for myself. I believe in trying to waste as little food as ever, and this is always a great hit when I am entertaining.

Pickled Garlic Scapes

I pickle these in a similar fashion as beans. The one thing I have learned through my experimentation, is that the scapes are like asparagus, you must pull the woody ends off.  If not, you end up with some extra un-edible chewy scapes.

2-3 lbs Garlic scapes, cut into 2 inch lengths

7 cups white vinegar

7 cups water

4 tsp coarse salt (1/2 tsp per pint jar)


First Prep your jars in hot soapy water.  Cut up your scapes (prepare for your whole house to smell like garlic goodness). Bring a small pot to boil and boil your jars and lids. Pack the scapes into the jars, and have them ready. In a large pot, combine the water, vinegar and salt.  Bring to a boil. Turn on low heat and pour your brine slowly over the scapes.  Leave 1/2 inch from the top of the jar and immediately put the tops on the jars.  Let sit, and the jars should self seal.  You will start to hear the sweet sound of popping from the jars, this is a sure sign the jars are sealed properly.

It’s best to let the scapes sit for a couple of months before opening to enjoy, this requires patience I know!  But trust me, it is well worth the wait.


I’m BAAACK

8 Jul

Well hello there!

Yes I know, slap my wrist, it has been forever!

I just spent the last better part of a year focusing on planning John and I’s wedding, which has now come and gone.  Officially, I am a married woman now!  I DIYed a lot of my wedding, so it kept me super busy and my mind occupied.

We did manage to still plant a huge garden this year, which I will be sharing some photos of.  I am going to focus this blog more on my cooking more than the gardening side of things.  I just need some time for the dust to settle and for me to get back on track after all the craziness.

So no new recipes for now, but my adventures in cooking shall commence this weekend when I finally will have some time to make something nice for my new husband!

Without further ado…. the garden!

2014-07-07 10.51.262014-07-07 10.51.34

2014-07-07 10.51.42

2014-07-07 10.51.54

2014-07-07 10.52.02


Be back soon with another post…..


Grilled Asparagus

10 Aug

I’m back!  and with a few more recipes to share with you!

I had a fantastic trip to Edmonton, seeing all my old haunts and all the changes that have happened since I left!   I also came back with some big news, John asked me to marry him!  So I am officially engaged and very excited.  Already I have dived into some wedding planning and using pinterest, among other websites to help me with this huge undertaking!  As you know, I am a very DIY kind of girl, so I am sure I will be sharing with you all the many things I have planned for this wedding!  For now I have a classic recipe of mine, it’s SO easy, anyone can do it and it’s also my stand by “need a quick side dish with little or no effort involved”.


Grilled Asaparagus

DSCF0641


  • Bunch of Asparagus
  • Olive Oil
  • Montreal Steak Spice

Snap the ends off your asparagus, drizzle olive oil, shake Montreal steak spice and toss on a plate until everything is evenly coated.

Fire up your BBQ and put on the bottom deck, grill and turn often so they don’t burn.  Cook until slightly browned on the outside and soft on the inside.

Serve and enjoy.

How easy was that!?


Garlic Shrimp in a Foil Pack

23 Jul

This was an experiment I did after reading an article about “cooking everything in a foil pack”.  I had a lot of different stuff going on the grill so I didn’t have any attention to give to the shrimp, so why not cook them in a foil pack!  It’s pretty fool proof and there is no way your going to completely dry these out!

DSCF0640

Garlic Shrimp in a Foil Pack

  • Bag of shrimp (I think mine was about a pound)
  • Juice of a lemon
  • 2 tbsp Olive Oil
  • 3 Cloves garlic, minced in a garlic press
  • salt
  • pepper

First get those shrimp marinading a few hours before you plan on cooking (or the day before works too).  I usually find a nice sized tupperware and throw all my ingredients in, put the lid on and shake it up well so all the contents are evenly distributed.

Refrigerate, have a few beers because the rest is easy.

Next, grab some foil, throw all the shrimp in. Wrap up your foil making sure there is some space between the top of the foil and the shrimp. Place on your already heated up BBQ’s top grill.  Basically for the jumbo shrimp I let it cook 10-15 minutes.  As long as its pink, its good to go and juicy!

Open up your foil, stir and enjoy!


Tomorrow I am off on a well deserved vacation, not going anywhere hot or fancy (it’s hot where I live) but I am heading back home to where I spent the first 25 years of my life – Edmonton, Ab.  I can’t wait to go to my old stomping grounds and see some people I haven’t seen in years!  So I am not sure if I will have time to update, but I know I will be coming home with a lot to talk about!

Bbq Fried Zucchini Ribbons

18 Jul

Admittedly, this is a dish I found on pinterest (my favorite place for recipes), but as always with any recipe I never follow it exactly. John bought me this really cool pan for the bbq, so I can now fry up my veggies straight on the grill.  This was my first time trying it and it worked out fantastic!  We always have a huge abundance of zucchini in the summer as they always produce prolifically, and I am always running out of ways to cook it.  I am sure this summer I will be posting several zucchini recipes, along with my classic way that I honestly got sick of, hence the discovery of:

BBQ Fried Zucchini Ribbons

DSCF0638

BBQ Fried Zucchini Ribbons

  • 3 medium sized zucchini, 2 green, 1 yellow (any combo will do, I just like color!)
  • olive oil
  • half of a lemon
  • several fresh basil and oregano leaves
  • a couple radishes
  • salt and pepper to taste

First take your zucchini and run a vegetable peeler along one of the sides to create “ribbons”, until you get down to the seeds and turn the zucchini over and continue on another side.  Do this until you only have the middle part left and throw into your compost bin.  Slice up a couple radishes thin and throw in.  Next, I Drizzled the olive oil and lemon and mixed until the ribbons are evenly coated.

Chop up your basil and oregano, toss that in along with your salt and pepper and your ready to cook!

Now you heat up your bbq on medium, and put your pan directly on the grill.  (or you can just fry this in a pan on your stove, but is that as much fun!???) Keep an eye on your zucchini and stir often.  I use tongs to turn over the zucchini until it’s evenly cooked all around, roughly 10 minutes.  Cook to the softness you personally enjoy, I like my zucchini well cooked so I probably could have gone longer!

It is all very foolproof, as long as you don’t walk away and forget about your dish!

Serve and enjoy! yum yum!

Baja in Tomato and Garlic

15 Jul

Baja in Tomato and Garlic

This is a super easy mediterranean dish that was fully inspired by dishes my dad made growing up.  Often he would cook shrimp or other kinds of seafood in tomato and TONS of garlic in those clay dishes you see quite often in mediterranean cooking.  This is a dish I cooked for our friend Fred, who has ate lots of my cooking experiments throughout the last few years.  Fred told me that he never ate fish until I started making it for him, it’s all in how you cook it and this is a tasty and easy way to do it.

\DSCF0639


  • 2-3 Baja (or any other whitefish) fillets
  • 1 jar canned tomatoes (I had some canned from John’s family) or a large can of tomatoes from the store
  • 4 cloves garlic, sliced
  • 1 onions, diced
  • 2 tbsp olive oil
  • several basil leaves
  • salt to taste

I did this dish on the side burner of my bbq, which made it much easier as I was doing the rest of our meal on the BBQ as well.  It saved me from running from the stove to the bbq.  Heat your pan on medium heat with olive oil drizzled in the bottom.  Add your garlic and onions and let fry for a minute or so, making sure they don’t burn.

Add the tomatoes and bring them to a boil.  Cut your fish into chucks and add to your pan.  Like this:

DSCF0637

Throw in the basil and as much salt as you enjoy . Let boil a few minutes each side until most of the liquid is gone.  Your finished result should look like the picture at the top. Serve and enjoy!

So easy, fish is full proof when you boil it in a liquid.  Very little chance of overcooking and drying out your fish.

Fantastic!


Jenn Crebas Photography

love. lifestyle. yoga

The Art and Science of Parenting

Learn how Darwin and the Dalai Lama would raise their love child

Wine Country BC

Beyond the Guided Tour of Wine in British Columbia

gitanalife

tales of la vida gitana